Discount Codes
1.1.6. Discount Codes
Path: Organizations>Edit Organization
Users can create discount codes for various purposes within the product. By clicking on the discount codes option, they can manage all their codes in one place.
Once a discount code has been used, it cannot be deleted. Inactive codes can be viewed, disabled, edited, or deleted.
1. Add New Discount Code:
To start the process, the user should click on the "Add New Discount Code" option.
![]()
This will open a new window or form where they can enter the necessary details for the discount code.
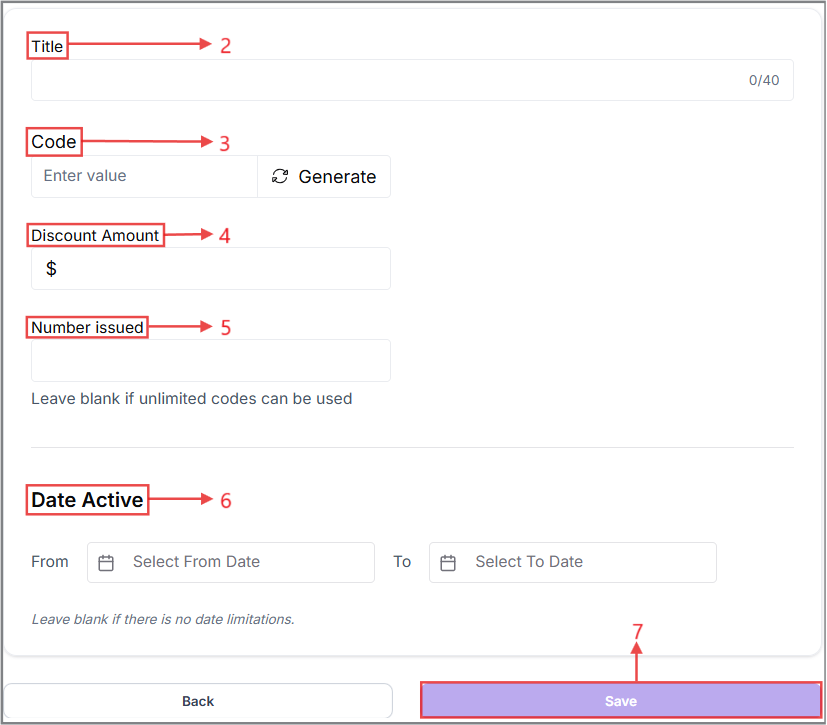
2. Title:
The user needs to enter a title for the discount code. This title will help in identifying and managing the code within the system.
3. Code:
The user has two options for the discount code itself:
- They can click on the “Generate” option, which will automatically create a unique code.
- Alternatively, the user can manually input their own custom code if they have a specific one in mind.
4. Discount Amount:
The user should specify the amount or percentage that represents the value of the discount. This defines how much the discount will be worth when applied.
5. Number Issued:
The user can define how many times the discount code can be used. This is useful for limiting the availability of the discount to a certain number of uses. If the user leaves this field blank, the code will have unlimited uses.
6. Date Active:
When creating a discount code, users can define its active period by specifying a start and end date (e.g., from January 1st to January 10th). During this time, the code can be used to avail the discount.
The behavior of the discount code depends on the specified activation date:
-
If the user indicates that the discount code will activate from a previous date or the current date and time, it will immediately appear in the “Active” section.
-
If the user sets the activation date for the upcoming days, the discount code will be listed in the “Inactive” section on the Discount Codes homepage. The code will become active once the specified date and time are reached and will turn “Inactive” after the designated time has passed.
7. Click on “Save”.
After saving the progress, the user can see a summary of the entries that the user had made earlier.
These above steps ensure that the discount code is set up with all necessary details and can be effectively managed and utilized.
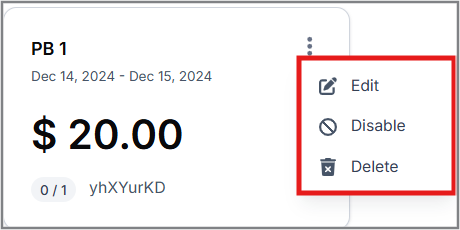
There are also other options regarding the generated discount code that the user will see after clicking the three dots. These options include:
-
Edit- This option allows the user to edit all the details of the discount codes if he wishes to.
-
Disable- This option disables the ongoing plan created by the user. Additionally, the user can disable an inactive plan from the inactive section or enable a previously disabled plan from the same section.
-
Delete- By clicking this option, the user will completely delete any discount codes that have been created.